Window tinting is the process of applying a thin adhesive film to your vehicle’s glass to reduce heat, block UV rays, and add privacy. Done correctly, the window tinting step by step process produces results that rival professional installations. You need a spray bottle filled with a baby shampoo and water slip solution, a quality squeegee, a sharp utility knife, a heat gun, and microfiber cloths before you start. Pre-cut film kits from brands like Gila or MotoShield Pro reduce waste for beginners. Expect a curing period of 2 to 5 days of haziness after installation, and plan to work inside a clean, shaded garage to keep dust and wind out of the equation.
What tools and materials do I need for window tinting step by step?
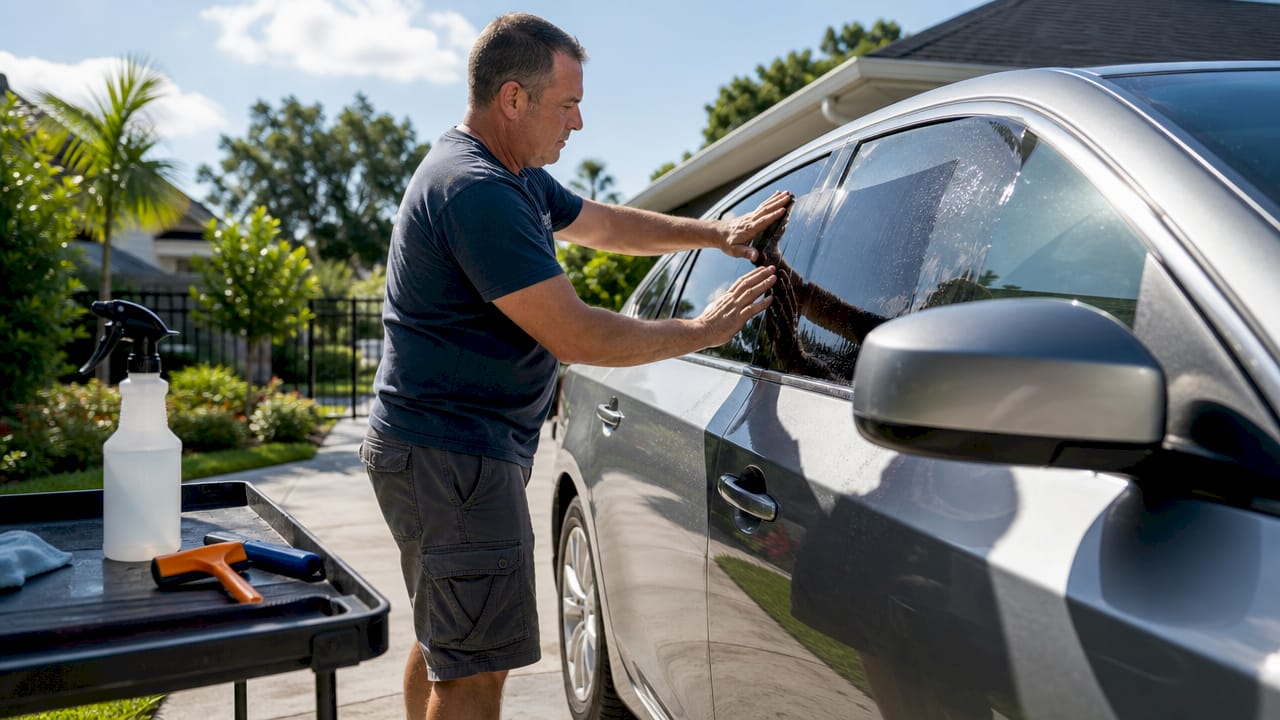
Assembling every tool before you begin is the single most effective way to avoid mid-install mistakes. Running to grab a forgotten squeegee while wet film sits on the glass is a fast path to dust contamination and adhesion failure.
| Tool | Purpose |
|---|---|
| Pre-cut tint film or film roll | The primary material; pre-cut kits reduce trimming errors for beginners |
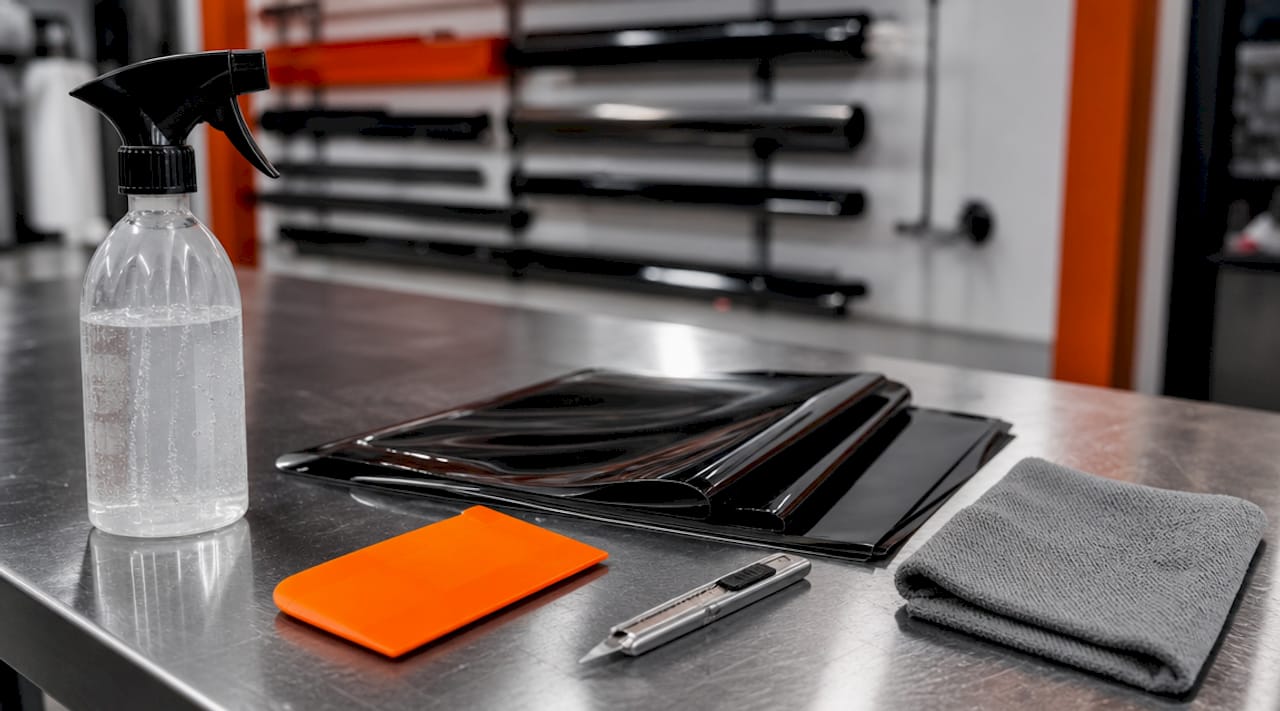
| Spray bottle with slip solution | Keeps glass and film wet for repositioning; mix water with a few drops of baby shampoo |
| Soft and hard squeegee | Soft for initial positioning; hard card for final water and air removal |
| Utility knife with fresh blades | Trims excess film along gaskets; dull blades tear film edges |
| Microfiber cloths | Lint-free cleaning before and after application |
| Heat gun or hair dryer | Shrinks film to conform to curved glass surfaces |
| Masking tape | Helps peel liner from film without touching the adhesive side |
Film quality matters more than most beginners realize. Cheap dyed films fade to purple within a year. Carbon and ceramic films from manufacturers like 3M, Llumar, or XPEL hold color, block more infrared heat, and carry longer warranties. Spending more on film upfront costs far less than a redo.
Pro Tip: Replace utility knife blades after every two windows. A fresh blade produces a clean edge cut; a dull one drags and lifts the film, creating peeling points within months.
How to prepare your vehicle windows before applying tint
Glass must be impeccably clean with zero residue or dust before film touches the surface. Even a single particle trapped under the film creates a visible bubble that cannot be removed after curing. This step is where most DIY tint jobs fail, and it deserves as much time as the application itself.
Start by rolling the window down about an inch and cleaning the top edge of the glass, which is the most overlooked area. Use a razor blade scraper held at a low angle with slip solution on the glass to remove mineral deposits, adhesive residue from old stickers, and factory coatings. Follow with a lint-free microfiber cloth to wipe the surface dry. Repeat the wipe twice. If you see any streaks or haze under direct light, clean again before proceeding.
Work inside a closed garage or shaded space. Wind carries dust particles that land on wet film instantly. Direct sunlight dries your slip solution too fast, which prevents proper film repositioning. Temperature between 60°F and 80°F is the practical sweet spot for adhesion.
Common prep mistakes to avoid:
- Using paper towels, which leave lint and fibers on the glass
- Skipping the top edge of the window where the gasket meets the glass
- Cleaning in direct sunlight, which causes streaks from rapid evaporation
- Touching the glass with bare hands after cleaning, which deposits oils
- Rushing past mineral deposits or sticker residue that will show under film
Pro Tip: Spray the cleaned glass with slip solution and hold a flashlight at a sharp angle to the surface. Any remaining dust or residue will cast a shadow. Clean until the surface looks perfectly uniform under that light.
For broader surface prep principles that apply across automotive film work, the vehicle preparation process follows similar contamination-control logic whether you are wrapping or tinting.
What are the step-by-step instructions for applying window tint film?
This is the core of any tinting car windows tutorial, and the sequence matters. Skipping or reordering steps causes defects that cannot be fixed without removing the film entirely.
-
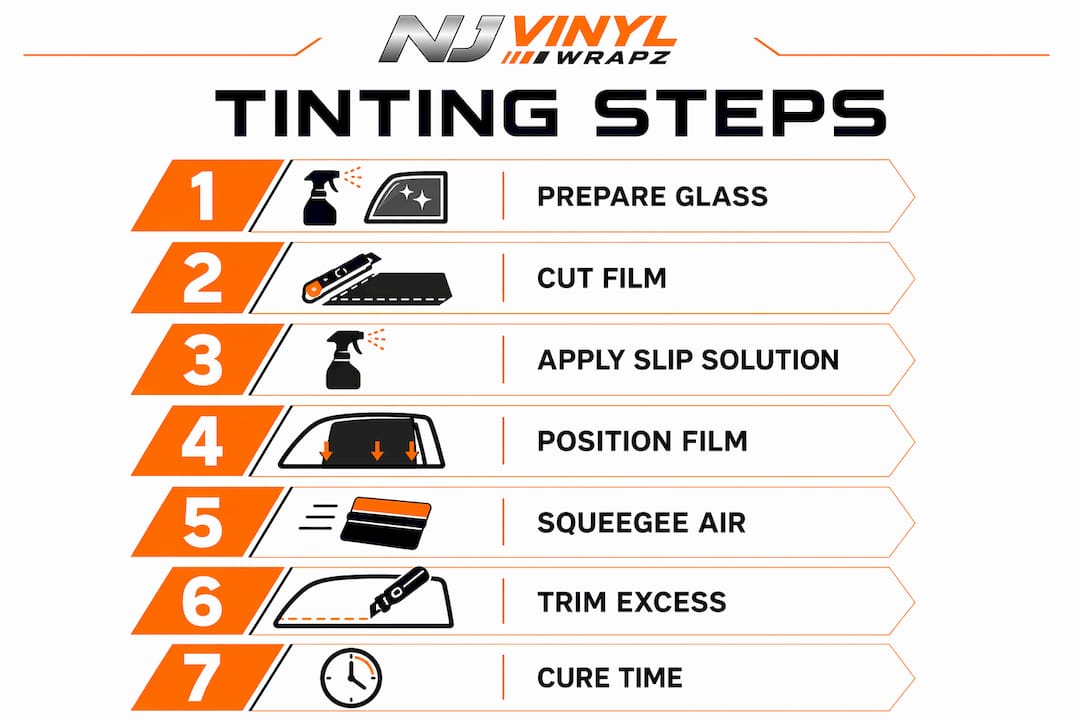
Measure and cut film oversized. Leave about 1 inch larger on all sides when cutting from a roll. Pre-cut kits skip this step. Cut on a clean, flat surface using a straightedge and fresh blade.
-
Wet the inside glass thoroughly. Spray slip solution generously across the entire interior glass surface. The glass must stay wet throughout positioning. Dry spots cause the adhesive to grab prematurely and prevent repositioning.
-
Peel the liner using the tape method. Place a strip of masking tape on each side of the film corner and pull in opposite directions to separate the liner from the adhesive layer. Spray the adhesive side immediately with slip solution to prevent it from drying or picking up dust.
-
Position the film on the wet glass. Start at the top edge and align the film with the window frame. Slide the film into position while the glass remains wet. Tuck the top edge under the rubber gasket using a hard card tool. This tuck is what prevents the top edge from lifting over time.
-
Squeegee from center outward. Overlapping strokes from center out and top to bottom push water and air toward the edges. Work slowly and methodically. Rushing this step traps moisture that extends curing time and increases bubble risk.
-
Heat shrink curved windows. Rear windows require heat shrinking before final installation. Apply heat to the outside of the film while it is still on the exterior of the glass, using continuous motion to shrink the film flat. Keep the heat gun moving constantly to avoid warping. Once the film lies flat, transfer it inside for final application.
-
Trim excess film. Use the window gasket or frame as your cutting guide. Hold the knife at a consistent angle and make one clean pass. Avoid sawing motions, which create jagged edges that peel.
-
Final squeegee and roll-up. Roll the window up slowly and perform final squeegee passes along all edges to expel remaining moisture. Pay extra attention to corners where water pools.
| Step | Key action | Common mistake |
|---|---|---|
| Cut film | Leave 1 inch excess on all sides | Cutting too tight before positioning |
| Apply slip solution | Keep glass and film wet throughout | Letting glass dry before film is placed |
| Peel liner | Use tape corner method | Touching adhesive side with fingers |
| Squeegee | Center outward, overlapping strokes | Rushing or using too much pressure |
| Heat shrink | Constant motion on curved glass | Holding gun in one spot |
| Trim edges | Follow gasket as guide | Sawing motion with dull blade |
Pro Tip: If the film shifts during positioning, do not panic. As long as the glass is still wet, you can slide the film freely. Spray more slip solution under the film if it starts to grip before you are satisfied with the alignment.
How to troubleshoot and avoid common window tinting mistakes
Curing takes 2 to 5 days of visible haziness, and full adhesion can take up to 30 days depending on temperature and humidity. The single most common DIY error is reworking the film during this window because the haze looks like a defect. It is not. It is moisture evaporating through the film, and it resolves on its own.
Do not roll your windows down for at least 48 to 72 hours after installation. Rolling down too early drags the film edge against the door seal, which peels the tuck you worked to create and causes permanent lifting at the top edge.
Common problems and fixes:
- Bubbles after curing: Small bubbles that persist past 5 days are usually trapped dust or air, not moisture. These do not resolve and require film removal and reinstallation.
- Edge lifting: Caused by missed gasket tucks or film cut too short. Tucking film edges under gaskets after rolling the window slightly prevents this. Use a hard card or shank tool to push the edge fully under the rubber seal.
- Haze that does not clear: Normal during curing. Avoid re-squeegeeing or touching the film aggressively during this phase, which causes edge defects.
- Film peeling at corners: Usually the result of a dull blade leaving a ragged cut edge. Trim again with a fresh blade if caught early.
- Contamination under film: Visible specks that appear after installation are dust particles missed during prep. Prevention is the only solution. Removal and reinstallation are required to fix this.
Controlling your environment during installation is the most underrated factor in a clean result. A garage with the door closed, a quick sweep of the floor, and a light misting of water in the air to settle dust particles makes a measurable difference in final quality.
How to check if your window tint is legal before you drive
Visible Light Transmission, or VLT, is the percentage of light that passes through your window film combined with the factory glass. Film rated at 35% VLT produces a lower installed VLT because factory glass absorbs additional light. This means a 35% film on standard factory glass may read closer to 30% after installation, which is illegal in states with a 35% minimum.
The film label percentage is not your legal installed VLT. This distinction causes more compliance problems for DIYers than any other single factor. Always verify installed VLT with a calibrated meter after installation, or ask a professional shop to measure it for you.
| Window location | Typical legal VLT minimum | Notes |
|---|---|---|
| Front side windows | 35% in most states | Strictest limits; affects driver visibility |
| Rear side windows | 20% or less in many states | More permissive in most jurisdictions |
| Rear window | 20% or less in many states | Often same as rear side windows |
| Windshield | Non-reflective strip only | Film on full windshield is illegal in all 50 states |
Laws vary significantly by state. New Jersey, for example, requires 35% VLT on front side windows. California requires 70% on front sides. Always check your specific state’s DMV regulations before purchasing film.
Pro Tip: Buy film rated 5% lighter than your state’s minimum to account for factory glass absorption. If your state requires 35% VLT, use 40% film. This buffer keeps you legal after the combined VLT calculation.
Medical exemptions exist in most states for conditions requiring reduced light exposure. These require documentation from a licensed physician and a certification sticker from the film manufacturer placed on the window.
Key takeaways
Successful DIY window tinting depends on surface preparation, correct slip solution use, disciplined squeegee technique, and respecting the full curing timeline before judging results.
| Point | Details |
|---|---|
| Prep is the foundation | Impeccably clean glass free of dust and residue prevents bubbles and adhesion failure. |
| Slip solution controls everything | Keeping glass and film wet throughout positioning allows repositioning and prevents premature adhesion. |
| Squeegee technique determines quality | Overlapping center-out strokes remove moisture and air; rushing this step causes persistent bubbles. |
| Curing requires patience | Haziness and minor bubbles for 2 to 5 days are normal; do not roll windows down for 48 to 72 hours. |
| VLT compliance is your responsibility | Film label percentage does not equal installed VLT; verify with a meter and check your state’s laws. |
What I have learned from watching hundreds of tint jobs go right and wrong
After years working in the vehicle customization space at Njvinylwrapz, the pattern I see most consistently is this: people spend 80% of their time on the application and 20% on prep, when it should be the reverse. The application steps are mechanical and learnable. The prep work is where judgment and attention to detail actually live.
The two steps most beginners underestimate are cleaning the top gasket edge and heat shrinking rear windows. The top edge is invisible during installation but becomes the first place film lifts in cold weather. Heat shrinking looks intimidating, but the technique is simple once you understand that the goal is continuous motion, not sustained heat in one spot. Short passes, constant movement, and patience produce a flat film every time.
I also tell every first-timer to buy a pre-cut kit for their first install. The cost difference between a pre-cut kit and a film roll is minor. The time saved and the reduction in cutting errors are significant. Once you have completed one full install with a pre-cut kit, cutting from a roll on your second vehicle feels far less daunting.
The curing phase is where impatience destroys otherwise solid work. I have seen clean installs ruined because someone rolled their window down at hour 36 to show a friend. Respect the 48-hour rule without exception. The film is not fully bonded, and that edge tuck you worked to achieve is fragile until the adhesive sets completely.
If you want to explore how vinyl decal application compares in technique, the surface prep and squeegee principles transfer directly.
— Krunal
Professional window tinting and vehicle services from NJ Vinyl Wrapz
DIY tinting works well on flat side windows, but rear windshields with complex curves, defroster lines, and tight gaskets are genuinely difficult without professional tools and experience. Njvinylwrapz has over 10 years of installation experience across New Jersey, working with premium film brands and climate-controlled facilities that eliminate the contamination variables that challenge home installs.

Whether you want professional window tinting in NJ or are considering a full exterior transformation, Njvinylwrapz offers color change wraps, PPF, ceramic coatings, and full vehicle wraps for personal and commercial vehicles. Get in touch with the team to discuss your vehicle’s specific needs and get a quote.
FAQ
How long does window tint take to cure fully?
Curing takes 2 to 5 days for initial haziness to clear, but full adhesion can take 7 to 30 days depending on temperature and humidity. Avoid rolling windows down for at least 48 to 72 hours after installation.
Can I apply window tint film myself without professional tools?
Yes. A spray bottle with baby shampoo solution, a quality squeegee, a utility knife, and a heat gun or hair dryer are sufficient for most side windows. Rear curved windows require more skill with heat shrinking technique.
What VLT percentage is legal for car windows?
Legal VLT is the combined percentage of film and factory glass together, not the film label alone. Front side windows in most states require 35% or higher, but laws vary by state and window location.
Why does my window tint look hazy after installation?
Haziness after installation is normal and caused by moisture trapped between the film and glass evaporating during the curing process. It clears within 2 to 5 days. Do not attempt to re-squeegee or peel the film during this phase.
How do I prevent bubbles when tinting car windows?
Glass must be perfectly clean before application, and squeegee strokes must work from center outward with overlapping passes to push all air and water to the edges. Bubbles that persist past 5 days after curing indicate trapped dust and require reinstallation.