A poorly wrapped van rolling down the Garden State Parkway with peeling edges and bubbled graphics does one thing loudly: it tells every potential customer that this business cuts corners. Vehicle wraps are one of the highest-ROI advertising investments available to New Jersey fleet managers, but that return evaporates the moment the vinyl starts lifting off a surface that wasn’t properly cleaned. This guide gives you a proven, step-by-step preparation process so your wrap adheres correctly, looks sharp from day one, and keeps delivering brand impressions for years.
Table of Contents
- What you need before wrapping a vehicle
- Step-by-step process for prepping your vehicle
- Common preparation mistakes (and how to avoid them)
- How to check your prep: Final inspection checklist
- Why meticulous prep saves money and maximizes wrap ROI
- Need expert installation? NJ Vinyl Wrapz can help
- Frequently asked questions
Key Takeaways
| Point | Details |
|---|---|
| Cleanliness is critical | Removing waxes, oils, and contaminants is essential for a long-lasting vehicle wrap. |
| Prep tools matter | Having the right supplies prevents issues and streamlines the wrap process. |
| Follow every step | Skipping proper cleaning or inspection often leads to wasted materials and a poor finish. |
| Avoid common mistakes | Prepare indoors, use fresh cloths, and inspect closely for best wrap results. |
| Professional help available | NJ wrap experts can ensure perfect prep and installation if you need a hands-off solution. |
What you need before wrapping a vehicle
With the importance of preparation established, let’s review everything you need to start the process the right way.
Preparation is not something you improvise. Walking into the job with the wrong materials, a dirty workspace, or insufficient lighting will cost you far more in rework than a proper supply run ever would. Before you touch a single panel, gather every item on this list.
Essential supplies for vehicle wrap prep:
- Wax and grease remover (dedicated wrap prep formula preferred)
- 70% isopropyl alcohol in a spray bottle
- Lint-free microfiber cloths (buy more than you think you need)
- Hard rubber and soft plastic squeegees
- Plastic razor blades for removing old decals
- Nitrile gloves to prevent skin oils from contaminating clean surfaces
- Compressed air canister or an air compressor
- Bucket, car wash soap, and a foam gun or wash mitt
- Painter’s tape for marking sections
- Adequate lighting (portable LED work lights work well)
Safety matters here too. Many prep chemicals, especially wax and grease removers, release fumes. Always work in a well-ventilated space, keep gloves on throughout, and avoid eating or touching your face while handling these products. Skin contact with concentrated degreasers can cause irritation.
The workspace itself is just as critical as the supplies. You need an indoor, climate-controlled environment that is free from dust, direct sunlight, and humidity. New Jersey weather is unpredictable. Summer humidity can prevent proper adhesion. Winter cold makes vinyl brittle and unworkable. A garage or shop with controlled airflow keeps conditions consistent.
| Supply | Purpose |
|---|---|
| Wax/grease remover | Strips waxes, silicones, and residue from paint |
| 70% isopropyl alcohol | Final surface wipe before application |
| Lint-free microfiber cloth | Cleans without leaving fibers or contamination |
| Plastic blade | Removes old decals and adhesive without scratching |
| Nitrile gloves | Prevents skin oils from contaminating the surface |
| Compressed air | Clears debris from seams, emblems, and crevices |
| Rubber squeegee | Aids in working vinyl into curves and edges |
As part of proper surface prep, wax/grease removers or 70% isopropyl alcohol must be used on lint-free cloths to strip all sealants, silicones, and residues, working in sections to avoid recontamination. This step is not optional and cannot be replaced by a basic car wash.
If you’re exploring the range of wrap options available for your fleet, the preparation process stays consistent across full wraps, partial wraps, and lettering. Clean is clean, regardless of vinyl coverage.
Pro Tip: Stock at least twice as many microfiber cloths as you think you’ll use. Once a cloth picks up wax residue, grease, or contaminants, it’s done. Reusing it spreads contamination right back onto the panel you just cleaned.
Step-by-step process for prepping your vehicle
Once you have your tools and space ready, here are the proven steps for perfect prep.
This is the sequence that separates a wrap that lasts five or more years from one that starts failing within months. Follow it in order, work in sections, and don’t rush any stage.
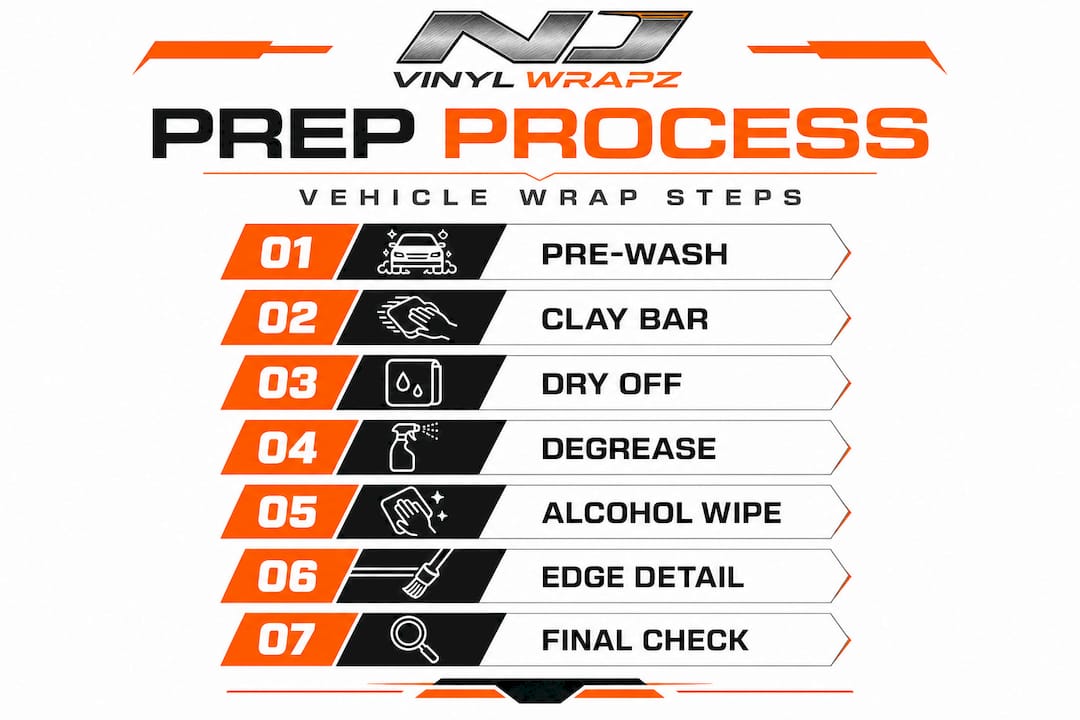
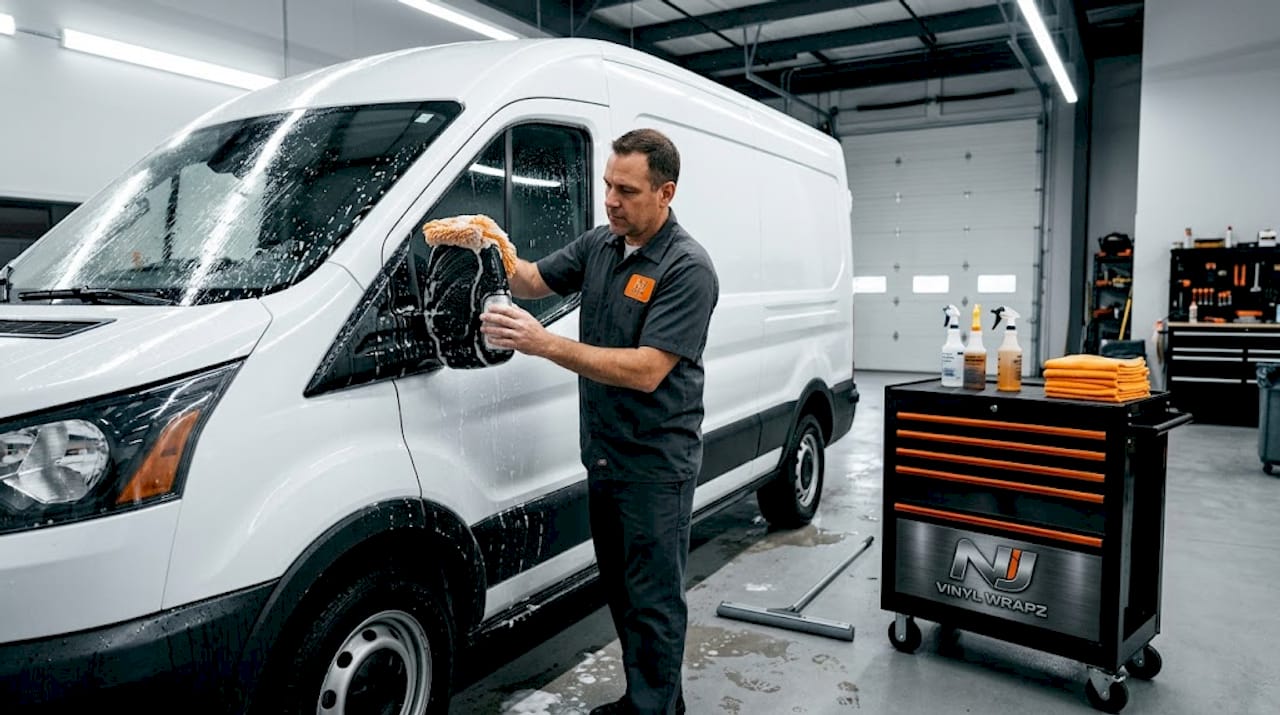
1. Pre-wash the entire vehicle. Use a degreasing car wash soap and a foam gun to remove surface dirt, road grime, and loose debris. Rinse thoroughly. Pay special attention to the undercarriage of side panels and the trim lines where dirt accumulates.
2. Clay bar treatment (if applicable). If the vehicle has been on the road for a while, bonded contaminants like rail dust, tree sap, or industrial fallout may be embedded in the paint. A clay bar removes these without scratching. Lubricate the surface, run the clay bar in straight lines, and wipe clean.
3. Dry completely. Use a clean microfiber drying towel and compressed air. Seams, door handles, side mirrors, and trim pieces trap water. Any moisture left in these areas will be sealed under the vinyl, creating bubbles or causing premature lifting. This step takes longer than most people expect.
4. Apply wax and grease remover. Spray onto a clean lint-free cloth, not directly onto the vehicle. Wipe each section down in straight lines, then immediately follow with a dry clean cloth. Wax, sealants, silicones, and residues must be completely removed using wax/grease removers or 70% isopropyl alcohol wipes, working in sections. This creates a chemically clean surface the vinyl adhesive can bond to.
5. Isopropyl alcohol wipe-down. Follow up the wax remover with a 70% isopropyl alcohol wipe on every surface that will receive vinyl. This is your final cleaning pass and your insurance that no chemical residue from the remover itself is left behind.
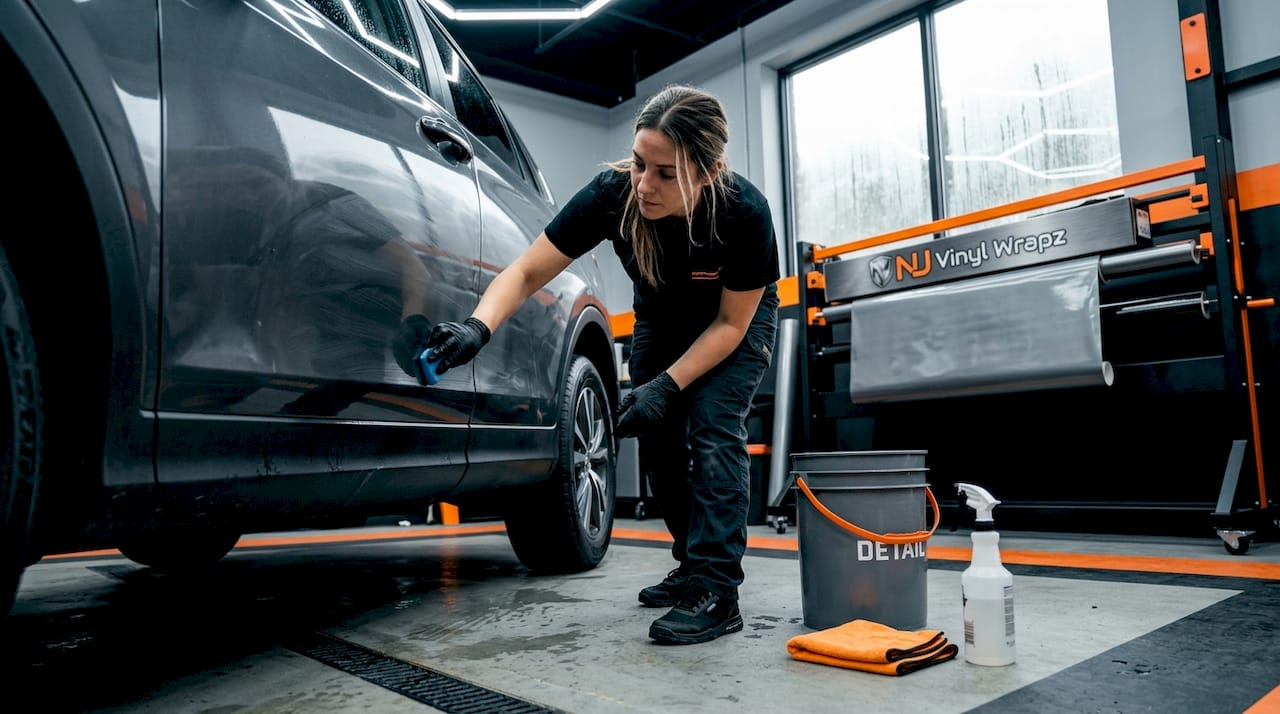
6. Detail the edges and crevices. Use a folded microfiber cloth and compressed air to get into every gap around badges, door handles, trim, mirrors, and fuel doors. These spots are where wraps fail first, so spending extra time here is worthwhile.
7. Final visual inspection. Under strong lighting, run your gloved hand across each surface. Feel for raised contaminants, rough spots, or areas that still feel oily. Any panel that doesn’t feel completely smooth and clean gets another pass.
The table below compares standard industry practices with common shortcuts some operators take in high-volume shops. Note that there are no specific New Jersey regulations for vehicle wrap preparation; industry-standard practices apply, focusing on clean, smooth surfaces for adhesion.
| Best practice | Common shortcut | Result of shortcut |
|---|---|---|
| Full degreasing with wax remover | Skipping to isopropyl only | Wax residue under vinyl causes lifting |
| Compressed air in all seams | Visual check only | Trapped debris creates bumps |
| Indoor, climate-controlled space | Outdoor prep in shade | Dust settles on surface before vinyl |
| Fresh cloths for each section | Reusing the same cloth | Contaminants spread back to clean areas |
| Full clay bar treatment | Skipping on older vehicles | Embedded grit creates imperfections |
For anyone looking at the full vehicle wrap process, this sequence applies to every panel. For large fleet wrap guidance, the same steps are repeated per vehicle, and consistent prep quality across every unit keeps your brand looking uniform on the road.
Common preparation mistakes (and how to avoid them)
Even with the right steps, fleet managers and owners often run into these common pitfalls.
Knowing what to do is only half the equation. Understanding where things go wrong in the real world helps you build habits that protect your investment.
The most common prep mistakes:
- Skipping the wax and degrease step entirely. This is the single most frequent cause of premature wrap failure. A vehicle that looks clean to the eye may still have layers of wax, silicone tire spray overspray, or detailing products on the paint. Vinyl will bond temporarily but start lifting within weeks.
- Leaving moisture in door seams and panel gaps. Water trapped under trim and in body seams turns into bubbles as it evaporates. Always use compressed air to force moisture out before the final wipe-down.
- Reusing contaminated cloths. A cloth used to remove wax is now loaded with wax. Wiping a freshly cleaned panel with it transfers contaminants right back. Designate each cloth for one use and one surface only.
- Prepping outdoors or in open bays. Dust is invisible until it’s trapped under your vinyl. Even a light breeze in an open garage door can deposit enough particulate to ruin a clean surface in minutes.
- Rushing between steps. Chemicals need time to work, surfaces need time to dry, and your eyes need time to see problems. Rushing turns a two-hour prep job into a five-hour fix later.
These errors show up in predictable ways: bubbling vinyl shortly after installation, edges that lift within the first season, and color patches where the adhesive failed completely. Each of these outcomes is completely avoidable. When it comes to partial wrap preparation, the edges where vinyl meets bare paint are especially vulnerable if the surface wasn’t properly degreased right up to the cut line.
“Remove all waxes, sealants, silicones, and residues using wax/grease removers or 70% isopropyl alcohol wipes on lint-free cloths, working in sections to avoid recontamination.” Skipping this step on even a single panel is the fastest way to waste an entire wrap investment.
For vehicles getting color change wrap tips, this is particularly important because every inch of painted surface will be covered, and any contamination underneath will be visible as a texture defect in the finished result.
Pro Tip: After your final cleaning pass, do a glove test. Put on a fresh pair of nitrile gloves and run your hands across every panel. If you feel anything, see a smear, or detect any greasiness, that area needs another degreasing pass before the wrap goes on.
How to check your prep: Final inspection checklist
After completing the cleaning and degreasing, use this inspection process to guarantee wrap-ready conditions.
Before any vinyl goes on, and before you call a technician to begin installation, verify these six checkpoints. This takes about 15 minutes and can save hours of rework.
Final prep inspection checklist:
- Surface is completely dry, including all seams, door jambs, trim gaps, and mirror bases
- No wax residue detected on any panel (test with isopropyl alcohol on a clean cloth, no yellowing)
- All old decals, adhesive, and ghosting from previous graphics have been fully removed
- Edges and crevices around emblems, trim, and handles are free of debris and dust
- No visible scratches, deep rock chips, or peeling clear coat that would affect adhesion
- Vehicle is in a controlled indoor environment with no new dust settling on surfaces
The table below gives you a quick reference for what success and failure look like at each checkpoint. Proper surface preparation using wax/grease removers or isopropyl alcohol on lint-free cloths, working in sections, is your baseline standard for every one of these checks.
| Checkpoint | Success indicator | Red flag |
|---|---|---|
| Surface dryness | No moisture visible or felt anywhere | Dampness in seams or behind trim |
| Wax removal | Clean cloth stays white after wipe test | Yellow or oily residue on test cloth |
| Decal removal | Smooth paint, no adhesive ghosting | Sticky or raised areas from old graphics |
| Edge and crevice cleanliness | No debris when compressed air is applied | Dust or debris ejected after wiping |
| Paint condition | Smooth surface with no peeling | Lifted clear coat or deep rust |
| Environment | Controlled, dust-free, 60 to 80 degrees Fahrenheit | Visible dust settling, humidity above 60% |
This checklist is equally relevant for vehicles receiving window tint preparation, where glass surfaces need the same disciplined cleaning process to prevent contamination under the film.
Why meticulous prep saves money and maximizes wrap ROI
With the checklist complete, let’s zoom out: here’s why diligent preparation pays off for your bottom line.
Here’s the perspective most articles skip: preparation is not a cost center. It is the highest-leverage investment in the entire wrap project. Most people think of the design and the vinyl as the expensive parts. They’re wrong. A failed wrap caused by poor prep will cost you the full price of removal, replacement materials, and reinstallation, plus the time your vehicle was off the road or carrying a damaged brand image.
We’ve seen it consistently across commercial fleets: the wraps that fail in year one or two were almost always traced back to shortcuts in cleaning and degreasing. Not bad vinyl, not poor design, not even application errors. Just a surface that wasn’t properly prepared before the installer started.
The math is straightforward. A full commercial vinyl wrap on a commercial van runs anywhere from $2,000 to $5,000 depending on complexity. Add removal and reinstallation costs, and a failed wrap can cost you nearly double. Spending an extra two hours on prep, and using $30 worth of additional supplies, is not an inconvenience. It is the single best ROI move in the project.
Fleet managers who run the lowest total cost of ownership on their wrapped vehicles share one thing in common: they treat prep with the same seriousness as the install itself. They assign dedicated prep staff, they don’t rush drying times, and they inspect before calling in the wrapping technician. The result is wraps that run their full five to seven year lifespan and deliver consistent, clean brand visibility for every mile of that time.
There’s also a less obvious return. Clean, well-adhered wraps maintain color vibrancy and sharp graphics longer. A wrap starting to lift at the edges or bubble in the center looks unprofessional. For fleet vehicles representing your company in New Jersey markets every single day, brand perception is a direct business asset. Protecting it starts with prep.
Need expert installation? NJ Vinyl Wrapz can help
If you want to ensure flawless results or have a complex fleet, these NJ experts have you covered.
Preparation is serious work, and for many fleet managers running multiple vehicles, handling it all in-house while keeping trucks on the road is simply not realistic. NJ Vinyl Wrapz handles the entire process for you, from surface prep through final installation, in a climate-controlled facility designed specifically for professional wrap work.
With over 10 years of experience wrapping commercial vehicles across New Jersey, the team at NJ Vinyl Wrapz understands what fleet branding demands in terms of precision, durability, and turnaround speed. Whether you need full vehicle wraps for an entire fleet or fleet vehicle wrap options built around consistent brand standards across dozens of units, we have the materials, facility, and expertise to deliver. Businesses looking for cost-effective brand coverage can also explore partial wraps for business vehicles as a targeted option. Reach out for a consultation and get a quote tailored to your fleet size and branding goals.
Frequently asked questions
Do I need to remove old decals before wrapping?
Yes, all old decals and adhesive must be completely removed before wrapping because they create raised edges and bonding failures under the new vinyl. Even adhesive ghosting left behind after decal removal must be cleaned off with isopropyl alcohol before the new wrap goes on, as outlined in standard surface prep guidelines.
Can I prep my vehicle outdoors or does it have to be indoors?
Indoor prep is strongly recommended because dust, humidity, and temperature fluctuations all compromise adhesion quality, even if the vehicle looks clean after outdoor washing. A single minute of airborne dust settling on a freshly degreased panel is enough to create visible imperfections under finished vinyl.
Are there any special laws for wrap prep in New Jersey?
No state-specific regulations govern vehicle wrap preparation in New Jersey. As standard practices confirm, industry-standard methods focused on achieving clean, smooth, contaminant-free surfaces apply across the board.
How long should I wait after washing before applying a wrap?
Wait until the vehicle is entirely dry, which includes seams, door frames, trim gaps, and any recessed areas that hold water. Depending on your drying method and vehicle type, this typically takes 30 to 60 minutes with compressed air assistance.