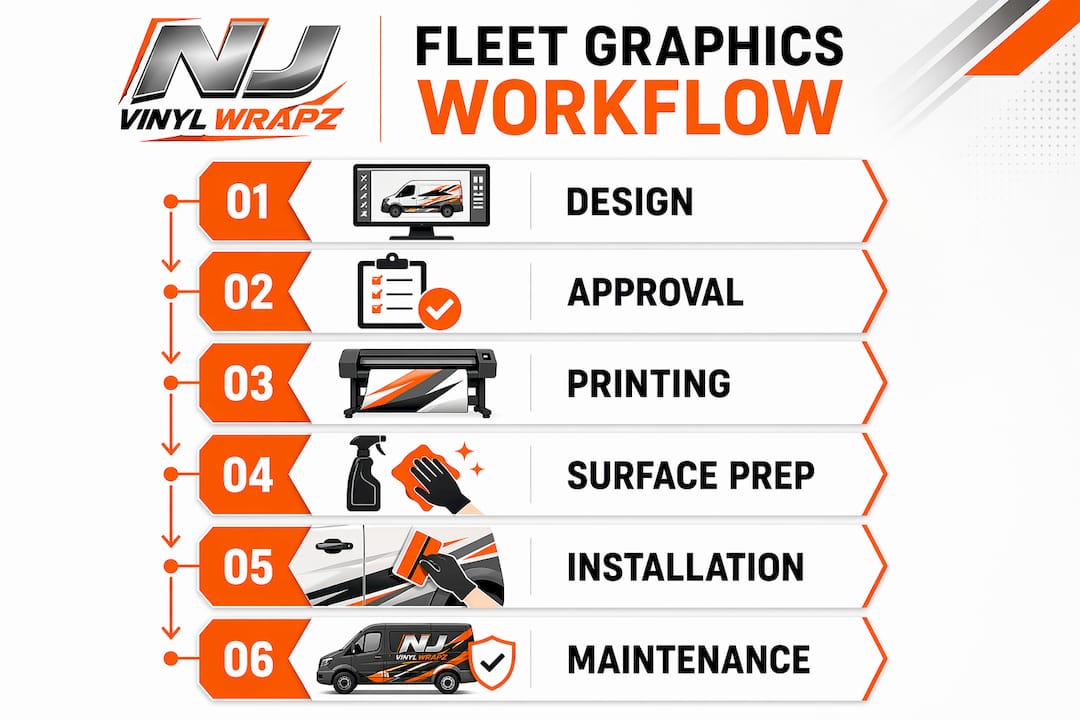
A fleet graphics workflow is the structured, repeatable process of designing, printing, and installing graphics across commercial vehicles to produce consistent branding and advertising at scale. Fleet managers who treat this as a random, job-by-job task end up with mismatched colors, compliance violations, and wasted material costs. The most effective approach combines reusable design templates, controlled production environments, and a disciplined installation sequence. This guide walks you through every phase, from selecting materials to post-installation care, so your fleet presents a unified brand image on every vehicle, every time.
What tools, materials, and preparations does a fleet graphics workflow require?
The foundation of any successful fleet graphics workflow is having the right tools, materials, and preparation protocols in place before a single panel gets touched. Skipping this phase is the most common reason fleet branding projects run over budget and over schedule.
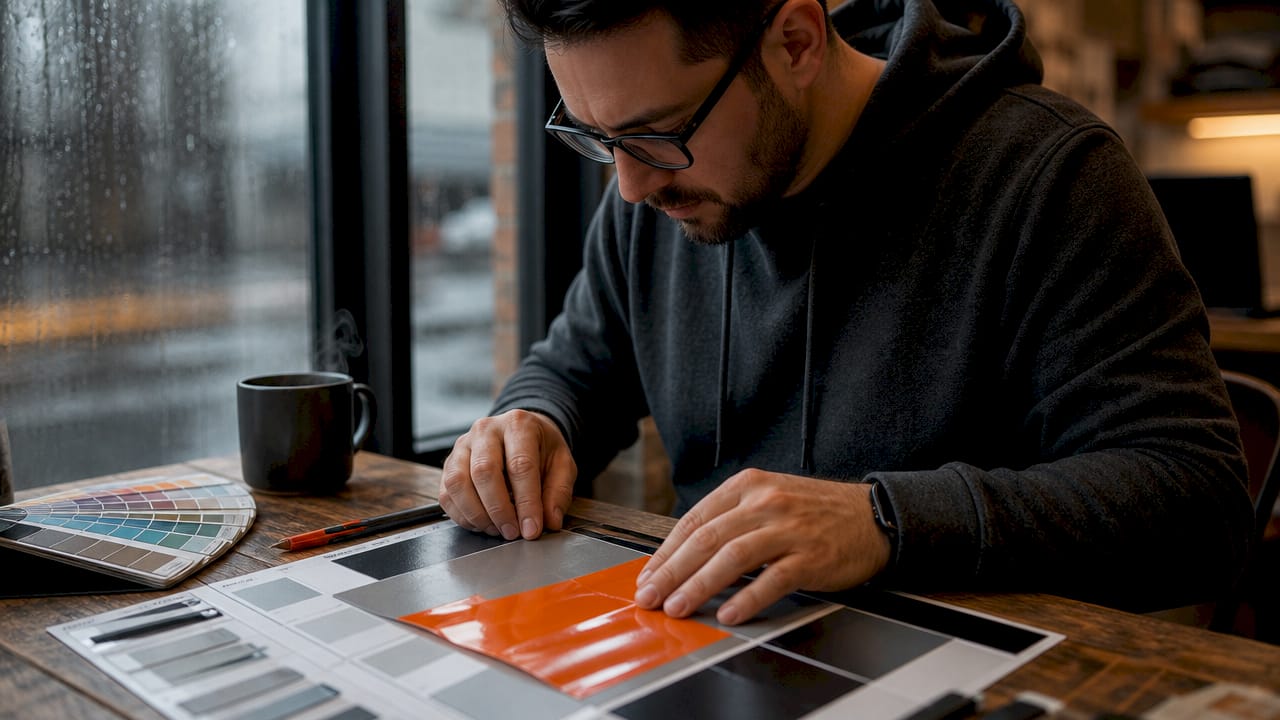
Design software and master templates
Adobe Illustrator and CorelDRAW are the industry standards for creating fleet graphics files. Both support vector formats that scale cleanly across vehicle sizes without quality loss. Your design files should be set up at 1:1 scale with bleed areas and cut lines clearly defined before they go to print.
Vinyl film types and print methods
Cast vinyl films from 3M and Avery Dennison are the professional standard for fleet applications. Cast vinyl conforms to curves and rivets without shrinking over time, which matters on vehicles that face daily sun, rain, and road debris. Digital printing handles full-color photographic designs, while screen printing works better for large runs of simple, spot-color graphics where color accuracy is non-negotiable.
Surface preparation requirements
Surface prep is where most DIY and low-budget installations fail. Clean, grease-free surfaces are non-negotiable. Use soap and water first, then follow with isopropyl alcohol at 70% concentration or higher to remove wax, silicone, and road film that soap alone cannot lift. This step directly determines whether your graphics bond properly or begin lifting within weeks.
| Category | Tool or Material | Purpose |
|---|---|---|
| Design | Adobe Illustrator, CorelDRAW | Create scalable, print-ready vector files |
| Film | 3M or Avery cast vinyl | Durable, conformable surface coverage |
| Printing | Digital wide-format printer | Full-color fleet graphics production |
| Prep | Isopropyl alcohol (70%+) | Remove wax, grease, and contaminants |
| Application | Squeegee, heat gun | Smooth application and edge bonding |
Pro Tip: Run a test print on every new material batch and compare it against your approved color standard before committing to a full fleet run. Color drift between print sessions is real, and catching it early saves you from reprinting an entire order.
How to develop reusable design templates for consistent fleet branding
Master templates are the single most underused tool in fleet branding management. Creating master templates per vehicle type locks in your brand colors, fonts, and layouts so that vehicles added to your fleet six months from now look identical to the ones wrapped today. This is the difference between a fleet that looks like a coordinated brand and one that looks like a patchwork of vendor decisions.
Start by building one approved template for each vehicle model in your fleet. A cargo van template, a pickup truck template, and a box truck template are three separate files because their dimensions, panel breaks, and curve profiles differ significantly. Each template should include:
- Locked brand color swatches in CMYK and Pantone values
- Approved fonts embedded or outlined to prevent substitution errors
- Designated zones for USDOT numbers, phone numbers, and regulatory text
- Bleed and safe-zone guides for each panel
- Notes on which areas cannot carry graphics due to door handles, fuel caps, or vents
Once templates are approved by your marketing team or brand manager, they become the single source of truth for every print order. Vendors receive the template, not a brief. This eliminates re-briefing cycles and the supplier-chasing that eats up fleet manager time. Structured fleet branding reduces administrative overhead and scales cleanly as your fleet grows.
The approval workflow matters as much as the template itself. Build a simple three-step sequence: design proof review, physical print proof sign-off, and final file release to production. Never skip the physical proof stage for a new vehicle model. Screen colors and printed colors diverge enough to cause real problems, especially with brand-critical colors like specific blues, reds, or greens.
For regulatory placements, USDOT numbers must be legible from 50 feet in daylight. Build this requirement directly into your template so it cannot be accidentally omitted or obscured by a design element. You can learn more about the vehicle wrap design process to refine your template-building approach before going to production.
What are the step-by-step best practices for printing and installing fleet graphics?
Production and installation are where your design investment either pays off or gets wasted. Follow this sequence on every vehicle without exception.
-
Confirm print specifications. Verify resolution (typically 720 to 1440 dpi for vehicle graphics), color profile (usually CMYK with Pantone spot color callouts), and film type before sending files to the RIP software. Mismatched profiles are the leading cause of color inconsistency across a fleet.
-
Inspect the vehicle surface. Look for rust, dents, peeling paint, and previous adhesive residue. Graphics applied over compromised surfaces will fail prematurely regardless of material quality. Address surface issues before scheduling installation.
-
Clean and degrease. Wash the vehicle with soap and water, then wipe all application areas with isopropyl alcohol. Allow the surface to dry completely before proceeding.
-
Check ambient temperature. Vinyl adhesive performs correctly only between 50°F and 80°F. Below 50°F, the adhesive will not flow and bond properly. Above 80°F, it becomes overly aggressive and causes application errors that are difficult to reverse. This is not a guideline you can bend on a hot summer afternoon.
-
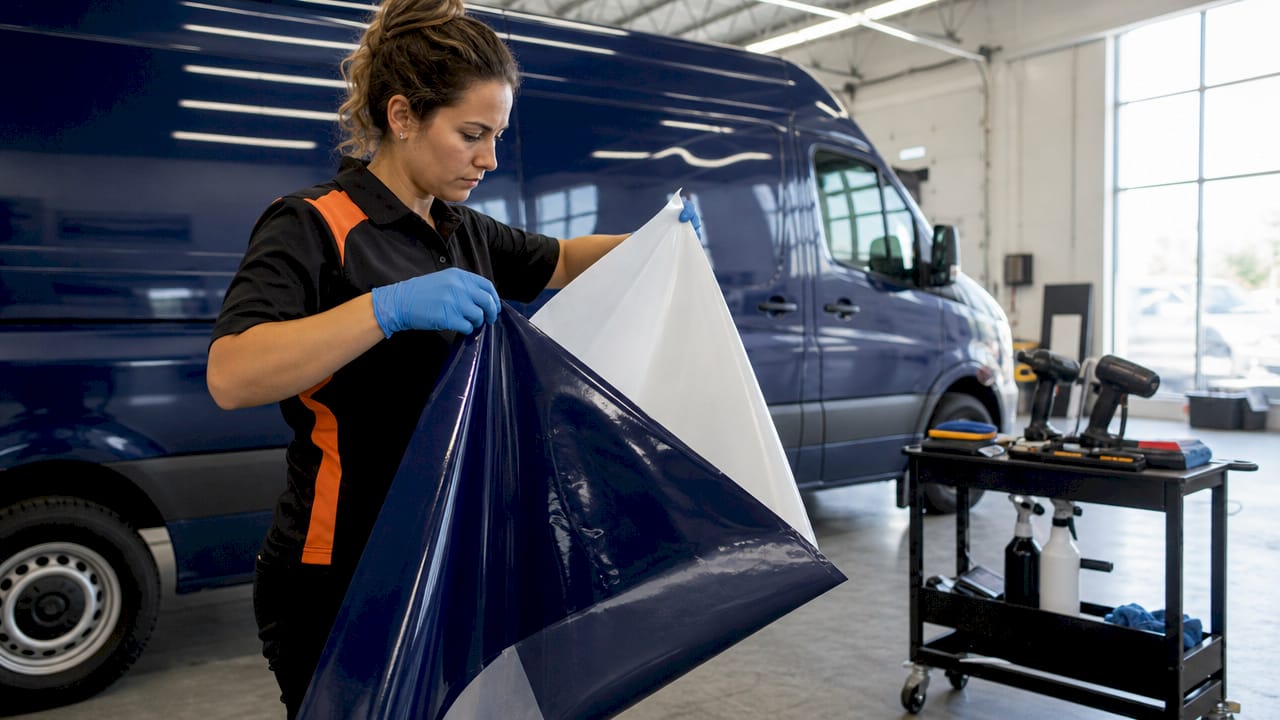
Choose your application method. The dry method is faster, taking roughly 5 minutes per panel for a proficient installer, and works well for experienced teams. The wet method uses water with two to three drops of dish soap per spray bottle, allowing repositioning before the adhesive sets. Wet application takes closer to 15 minutes but reduces the risk of misalignment on large panels.
-
Position and squeegee. Use masking tape as a hinge to hold the graphic in position before committing. Work from the center outward with firm, overlapping squeegee strokes to push air toward the edges. Never squeegee from an edge inward.
-
Apply heat to edges and seams. Heat treating edges with a heat gun activates the adhesive, strengthens the bond, and prevents lifting on curves, rivets, and panel transitions. This step is especially critical on bumpers, mirrors, and door edges.
-
Remove transfer tape. For wet applications, wait 10 minutes before pulling transfer tape to allow the adhesive to set. Pull at a low angle, not straight up, to avoid lifting the graphic with the tape.
-
Inspect the finished installation. Check for bubbles, lifted edges, and color alignment against your approved proof. Address any defects immediately while the adhesive is still workable.
Pro Tip: Do not wash or power wash the vehicle for at least 24 hours after installation. Avoid waxing for 48 hours. The adhesive needs time to cure fully, and early exposure to water pressure or chemicals compromises the bond before it reaches full strength.
For a detailed walkthrough of the application process, the vinyl decal application guide from Njvinylwrapz covers practical techniques that apply directly to fleet vehicle work.
How to maintain quality and regulatory compliance throughout the fleet graphics lifecycle
A fleet graphics installation is not a one-time event. It is the start of an ongoing management responsibility that covers compliance, condition monitoring, and rebranding logistics.
Regulatory compliance starts at installation and must be maintained throughout the vehicle’s service life. USDOT numbers must remain clearly legible at all times. Fading, peeling, or physical damage that obscures regulatory text creates liability exposure and can result in roadside violations. Build quarterly visual inspections into your fleet maintenance schedule, not just annual ones.
Record-keeping is the operational backbone of a well-managed fleet branding program. Structured fleet branding records for every branded vehicle enable easy repeat orders and eliminate the need to re-brief vendors each time a vehicle is replaced or rebranded. Your records should include the vehicle ID, wrap date, material batch number, installer name, and the specific template version used.
The table below maps common symptoms to their corrective actions:
| Symptom | Likely Cause | Corrective Action |
|---|---|---|
| Edge lifting | Insufficient surface prep or heat treatment | Clean edge, apply heat, press and re-bond |
| Bubbling under film | Trapped air or contamination | Pierce with pin, squeegee flat, apply heat |
| Color fading | UV exposure without laminate | Replace panel with laminated film |
| Peeling USDOT decal | Applied to curved plastic or aluminum | Remove and reinstall on approved flat surface |
| Mismatched colors | No color management protocol | Establish Pantone standards and test prints |
Vehicle rotations and rebranding present a specific challenge for growing fleets. When a vehicle leaves service or gets reassigned, the graphics must be removed cleanly without damaging the paint, and new graphics must match the current brand standard exactly. This is where your master templates pay for themselves. A vendor can pull the current approved template and produce a replacement set without any back-and-forth. You can explore fleet wrap services that handle this kind of turnover efficiently if managing it in-house creates scheduling bottlenecks.
Why I treat fleet branding as a capital asset, not a line item
After working with commercial fleets across New Jersey for over a decade, the clearest pattern I see is this: businesses that treat fleet graphics as a recurring expense manage them reactively. Businesses that treat them as a capital asset manage them proactively, and their fleets look dramatically better five years in.
The master template approach is not just a design convenience. It is a brand protection strategy. Every time a new vehicle gets wrapped without a locked template, you introduce the risk of a slightly different shade of blue, a slightly different font weight, or a logo that is two inches too large. Individually, these errors seem minor. Across a 20-vehicle fleet, they make your brand look unmanaged.
The part most fleet managers underestimate is vendor selection. A low-cost installer who works in an uncontrolled environment, without managing environmental conditions like temperature and workspace cleanliness, will produce results that fail within 18 months. The cost of removal, reprinting, and reinstallation far exceeds the savings from the original discount. Choose installation partners based on their facility and process controls, not just their price per vehicle.
My honest advice: build your fleet branding program around documentation. Templates, records, approved vendor lists, and inspection schedules. The businesses I have seen scale from 5 vehicles to 50 without losing brand consistency are the ones that treated this as a system from day one.
— Krunal
How Njvinylwrapz can support your fleet graphics workflow
Njvinylwrapz delivers end-to-end fleet branding services for commercial fleets across New Jersey, covering custom design, premium printing with 3M and Avery materials, and expert installation in a climate-controlled facility. Whether you need full vehicle wraps for a growing fleet or targeted lettering and decal programs, the team manages the entire process from template creation to on-vehicle installation. With over 10 years of experience and licensed, insured operations, Njvinylwrapz handles fleet rotations, rebranding projects, and compliance-critical placements with consistent results. Contact Njvinylwrapz to get a fleet branding assessment and a production timeline that fits your operational schedule.
FAQ
What is a fleet graphics workflow?
A fleet graphics workflow is the end-to-end process of designing, producing, and installing graphics across multiple commercial vehicles to achieve consistent branding. It covers design template creation, print production, surface preparation, application, and ongoing maintenance.
What temperature is required for vinyl graphic installation?
Vinyl graphics must be applied when ambient and surface temperatures are between 50°F and 80°F. Outside this range, adhesive performance degrades, leading to peeling, bubbling, or bonding failures.
How long should you wait before washing a vehicle after graphics installation?
Wait at least 24 hours before washing and 48 hours before waxing or power washing. This curing window allows the vinyl adhesive to reach full bond strength without being compromised by water pressure or chemicals.
Why are master templates important for fleet branding?
Master templates lock in brand colors, fonts, and layouts so every vehicle in the fleet matches precisely, even when graphics are applied months or years apart. They also eliminate re-briefing vendors and reduce administrative overhead as the fleet scales.
What are USDOT decal placement requirements?
USDOT numbers must be legible from a minimum of 50 feet in daylight and installed on a clean, flat surface. They cannot be placed on heavily curved plastics or aluminum panels that compromise adhesion or readability.